

https://www.copymethat.com/r/pTslEAEFj/the-most-incredible-and-unbelievable-low/
23397996
5LMvpsV
pTslEAEFj
2024-10-21 10:43:58
"The most incredible and unbelievable low carb tortillas ever."

loading...
X
Hey all, I was enchanted a while ago (as I'm sure everyone was) by the amazing, yeast risen bread recipe posted a little bit ago here
I played around with that recipe and made some of the best keto hot dog and hamburger buns I've ever had. They were amazing! And so much easier to make than trying to fight the fathead pizza dough and turn it into something it never wanted to be. The buns soak up sauces, are soft and squishy, and just so satisfying. I recommend anyone who hasn't tried them, try it when you want to bake something and blow yourself away.
I've been looking for a holy grail tortilla for quite some time. I used Craig's from ruled.me when I wanted to have a lower carb tortilla than what you get at the store, and they worked great. But they are still kind of fussy, and I could never eat more than one because how heavy they were. So I decided to try my hand at using the bread recipe and modifying the steps to tortilla steps instead of bread steps. People have already succe
Servings: 8
Servings: 8
Ingredients
- Liquid ingredients
- 1 Cup water
- 2 Whole Eggs
- 2 Tablespoons cooking oil (I use avocado oil, but any is fine)
- 1 Tablespoon melted butter
- Dry Ingredients
- 1.25 Cups Vital Wheat Gluten
- .5 Cups Oat Fiber
- .66 Cups Ground Golden Flax Seed
- 3 Tablespoons Swerve Sweetener
- 1 teaspoon Xanthan Gum
- 1 teaspoon Salt
- 1 teaspoon Baking Powder
Steps
- Whisk together the wet ingredients.
- Mix together the dry ingredients.
- Dump the wet ingredients onto the dry ingredients, mix until no dry spots remain and mixture looks homogenous.
- Mix the dough until it stops being a wet sticky mass and gluten has developed (This is the hardest part. I used a food processor with the dough blade and kept it going for about 5 minutes before it started coming together into a ball of dough.) This step can take anywhere from 5 minutes (food processor, using pulses) to 10 minutes (kitchenaid, using the paddle attachment until it's starting to become cohesive, then using the dough hook until it forms a shaggy ball and doesn't stick to anything that looks at it) to 20 minutes (hand mixing, you poor unfortunate soul). Resist the urge to add more wheat gluten or oat fiber, it WILL come together eventually
- Once it has come together into a tacky (not sticky) ball, lightly dust a bowl with oat fiber, place the ball of dough in the bowl, then sprinkle some more oat fiber on top. Let this rest for about 15 minutes to relax the gluten a bit.
- After resting, grab your best, smoothest rolling pin and curse your mother for giving birth to you. This dough is annoying to roll out (but it's worth it)
- Divide the dough into 8 portions.
- Sprinkle some oat fiber on your counter/cutting board/whatever you're rolling these out on. (I used parchment paper on my butcher block cutting board.) Place a dough ball on your floured rolling surface, then sprinkle some more oat fiber on top of the ball. Then rub fiber on your rolling pin. Then bathe in/snort/whatever the fiber. This dough is sticky and resilient. You need all the help you can get.
- Roll the dough into a disc. Every couple passes, flip the dough over and rotate it 90 degrees. Keep doing this until it's the size/shape you want it. This dough can get very thin without tearing. You could probably read a newspaper through it if you wanted to. I get my news from reddit though, so this wasn't an option for me.
- After the dough ball is the size and shape you want to cradle your foodstuffs, place it on some parchment paper or floured towel or something. You just want to make sure it doesn't stick to anything as you roll the other balls out.
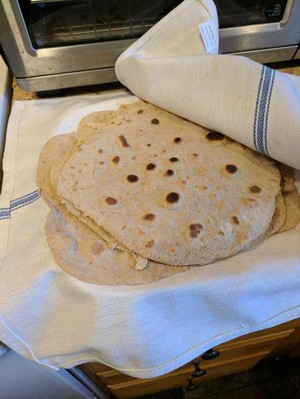
- Finish rolling them all out. As you start working on the last couple, preheat a pan (Cast iron is amazing, but I used a non-stick skillet) Do not add oil, unless you want to fry your tortillas when you cook them
- When your pan is nice and hot, add a tortilla and wait 30 seconds to a minute. You'll probably get little bubbles forming. That's excellent. But even so, you're probably not going to see much action just yet. That happens when you flip the tortillas.
- Flip the tortilla (I find tongs work best for this stuff, but a fork works in a pinch). Notice after a couple seconds your tortilla gets some huge bubbles. That's great! the tortilla will deflate once it's off the heat. (If you rolled these a bit thicker, and cooked these on a hot stone or baking steel in the oven, this would be pita bread and those big bubbles would fill the whole thing until it looked like a sweet, golden brown, napalm hot pillow.)
- After cooking on the second side for another 20 t0 30 seconds, pull it off the heat. You may be tempted to cook longer, but at this point they overcook really quickly.
- Repeat with the rest of your prepared tortillas.
- Slather in butter. Make a burrito. Make a quesadilla. Do whatever you want, they are your #$*&ing homemade tortillas.
- I'm a bit too lazy to do the exact math, but this recipe has roughly 22 grams of carbs per batch. That means if you make 8 tortillas, each tortilla is a hair over 2.5 grams of carbs. That's INSANE. They taste so much better than the low carb options you get at the store (where the first ingredient is whole wheat flour. Seriously?) and they are half the carbs.