

https://www.copymethat.com/r/KNgnha8I3/wendys-chili-the-real-deal-or-as-close-t/
11427353
weOeDD6
KNgnha8I3
2024-09-20 00:51:56
Wendy’s Chili, The Real Deal (or as close to it as you’ll get)


loading...
X
Will the real Wendy’s Chili please stand up?
Todd Wilbur and many others have tried to reproduce Dave’s famous chili, but all have fallen just short of the actual recipe. Never fear, I have arrived to set everyone’s minds, and tastebuds, at ease.
I learned to make Wendy’s chili when I worked at a Wendy’s during high school. Since then, every copycat recipe I have come across fails to add the most important step in Dave’s recipe (I have no clue how Todd Wilbur missed this). When I worked at Wendy’s, we kept a clean food grade bucket in a small refrigerator right by the grille. When a hamburger patty had been on the grille for to long (turning dark brown, crispy, and dried out), it was declared “chili’d” and tossed in the “chili” bucket. These “chili’d” hamburger patties would then be used as the base for that famous bowl of chili yumminess. This one step imparts such an important flavor, failure to complete it means you will never experience a true bowl of Wendy’s Copycat Chili.
Servings: 24 8-ounce servings
Servings: 24 8-ounce servings
Ingredients
- note: see notes
- subheading: Meat:
- 2 pounds 80/20* ground beef
- subheading: Fresh Ingredients:
- 1 to 1½ cups diced onion (1 medium-large onion)
- ¼ to ½ diced green bell pepper (depending on pepper size, around ½ cup)
- subheading: Canned:
- Two 14.5-ounce cans tomato sauce, or One 14.5-ounce can tomato sauce and One 11.5-ounce can of tomato juice (water can be substituted)
- Two 14.5-ounce cans pinto beans (with liquid)
- Two 14.5-ounce cans kidney beans (with liquid)
- Two 14.5-ounce cans stewed tomatoes, diced (with liquid)
- One 4 oz can diced Hatch green chiles, or 2 fresh Hatch green chiles (roasted, seeded, and diced)
- subheading: Spices:
- ¼ cup chili powder
- 2 teaspoons garlic powder
- 1 to 2 teaspoons ground cumin (I use 1½ teaspoons, this can be adjusted to taste but remember a little goes a long way)
- 1 teaspoon ground oregano
- 1 teaspoon ground black pepper
- 2 teaspoons salt
- 1 teaspoon sugar
- ¼ to ½ teaspoon cayenne pepper (to taste)
- subheading: Garnishes/Toppings:
- shredded cheddar cheese
- diced white onion
- saltine crackers
- sour cream
- note: see notes
Steps
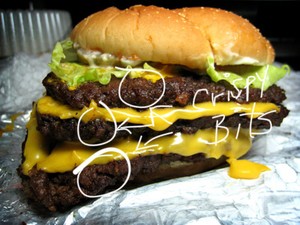
- This is the most important step in this recipe! Place ground beef in a heavy bottom stock pot, or your Instant Pot on sauté, and season with 1 teaspoon of salt. Brown ground beef until it starts to get CRISPY DARK BROWN bits!!!* (see “Crispy Bits” burger photo) Failure to cook the beef until it gets CRISPY DARK BROWN bits in it, will result in a chili that does not taste like Wendy’s chili.
- Remove ground beef and set aside, leaving any fat behind* (DO NOT DRAIN OFF FAT). Sauté onion and bell pepper in ground beef drippings until onion is translucent and bottom of stock pot, or Instant Pot, is deglazed.
- Everybody in the pot, it’s party time! Add all ingredients (everything except the garnishes) back into the stock pot, or Instant Pot set on “Slow Cook” “Normal”, and simmer for at least two hours. I normally use my Instant Pot and set the timer for 4 to 8 hours. The longer you simmer the chili, the better the flavors meld together, but it’s definitely edible after two hours or so.
- Dish and serve-it-up Dave’s way, with shredded cheddar cheese, diced white onion, crackers, and sour cream, on the side.
- * see notes
Notes
- Ground Beef: I use either 80/20 or 85/15. I do not suggest using 73/27 as it contains way to much fat. I also do not suggest anything above 90/10 as it does not contain enough fat.
- Celery Strings: As a gastric bypass patient, I learned that celery strings are very difficult to digest, and is often the cause of many digestive problems after being eaten (who knew). Since learning this, I always de-string celery before using it in recipes, or even eating it with peanut butter. It’s very easy to remove the strings, and Milly will show you how: Milly De-Threads Celery
- Fat Drippings: To drain or not to drain? DO NOT DRAIN! As the chili cooks the fat will rise to the top and seal the heat in. Not only does it add flavor to the dish, the small amount you get in your bowl when you ladle-up your chili, actually acts as an insulator keeping your chili toasty hot. For health conscious individuals, you can simply skim the fat off prior to serving the chili.
- Enjoy!